Traefik with Cloudflare inside Docker, simplified.
Running multiple services on a single VPS used to mean wrestling with NGINX configs, manual certificate renewals, and cron jobs holding it all together. Traefik changes that: it reads Docker labels, discovers services automatically, and handles Let’s Encrypt certificates without manual intervention. Pair it with Cloudflare’s DNS challenge and every container you deploy gets wildcard TLS — even behind Cloudflare’s proxy — with zero additional config per service.
By the end of this guide you’ll have:
- Traefik v3 running as your edge router inside Docker
- Automatic HTTPS for every service via Let’s Encrypt + Cloudflare DNS challenge
- The Traefik dashboard secured behind HTTP Basic Auth on its own subdomain
- A repeatable label pattern to expose any new container in under a minute
Why DNS challenge instead of HTTP challenge
Let’s Encrypt offers two verification methods. The HTTP challenge requires Let’s Encrypt’s servers to reach port 80 on
your machine to confirm domain ownership. The DNS challenge requires you to create a TXT record in your DNS instead.
DNS challenge wins for three reasons:
Wildcard certificates. *.yourdomain.com — a single cert covering every subdomain — requires DNS challenge. HTTP
challenge can only issue certificates per individual subdomain.
Works behind Cloudflare’s proxy. When Cloudflare proxies your traffic (orange cloud), Let’s Encrypt can’t reach your real IP. DNS challenge doesn’t care — it reads your DNS, not your server.
No port 80 exposure needed. If your VPS firewall blocks inbound 80, HTTP challenge fails silently. DNS challenge has no such dependency.
Traefik’s Cloudflare provider handles TXT record creation and cleanup automatically on each certificate renewal. You provide two API tokens; Traefik does the rest.
Step 1 — Create two Cloudflare API tokens
Two tokens, not one, because they have different permission scopes. Scoping tokens to only what they need is good hygiene when you’re handing credentials to a long-running process.
Go to Profile → API Tokens → Create Token → Get Started (custom token).
Token 1 — DNS Edit
This token lets Traefik create and remove the _acme-challenge TXT records during certificate issuance.
- Permissions:
Zone→DNS→Edit - Zone Resources:
Include→Specific zone→ your domain - Client IP Address Filtering:
Is in→ your VPS IP (optional, but worth doing) - TTL: leave blank unless you want forced rotation
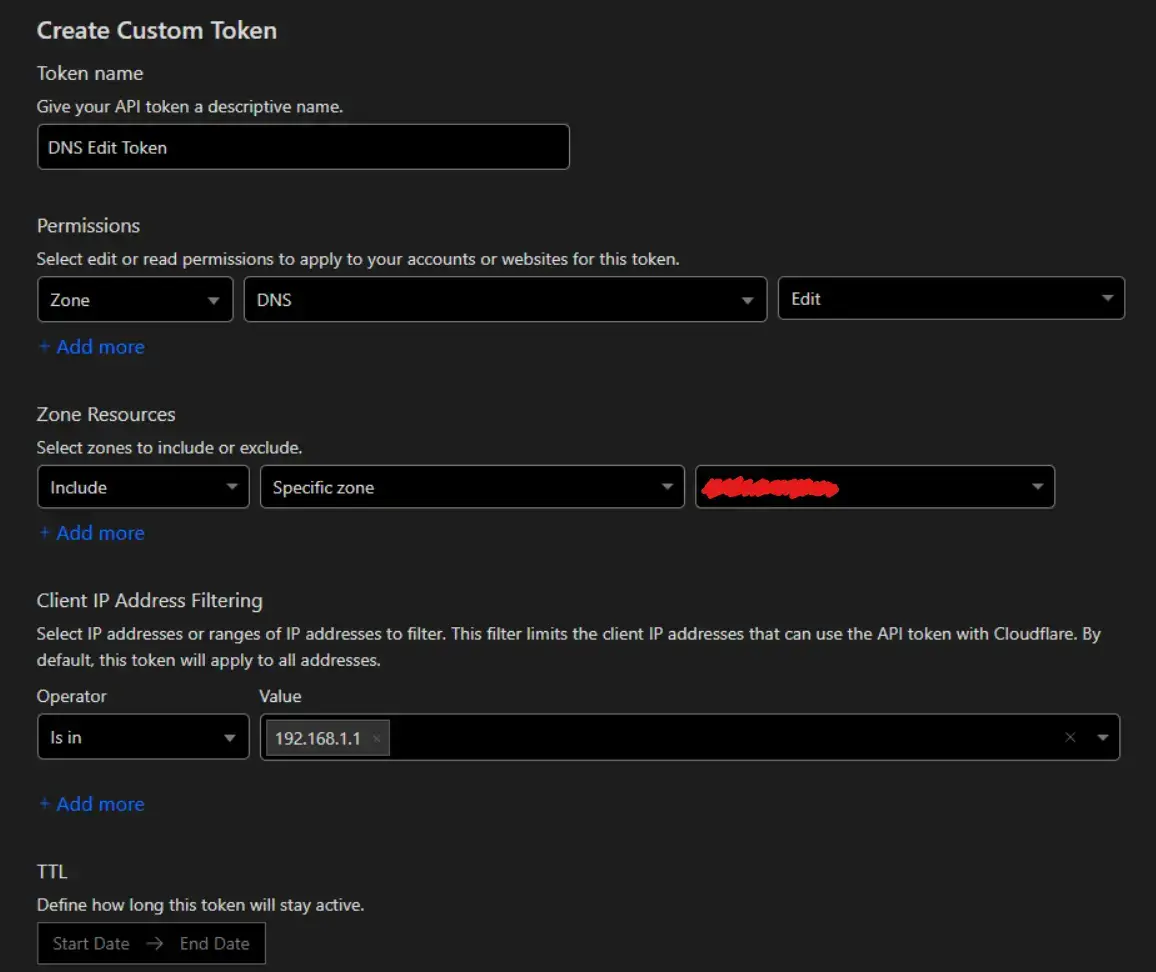
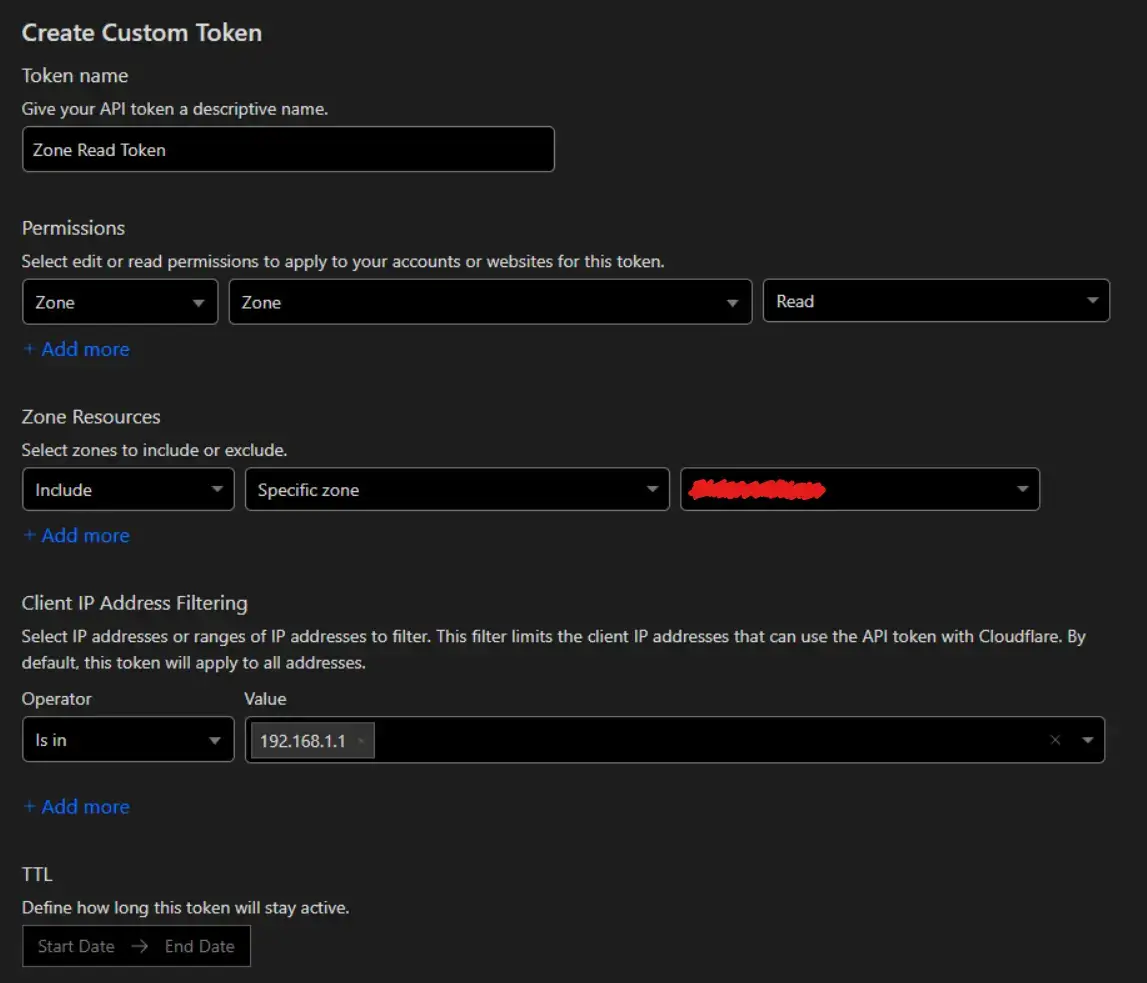
Token 2 — Zone Read
This token lets Traefik resolve your zone ID — required to know which zone to modify.
- Permissions:
Zone→Zone→Read - Zone Resources:
Include→Specific zone→ your domain - Client IP Address Filtering:
Is in→ your VPS IP
You also need the Global API Key from Profile → API Tokens → Global API Key → View. Despite the name, Traefik’s
Cloudflare provider currently requires it alongside the scoped tokens.
Store all of them in a .env file next to your docker-compose.yml:
CF_API_EMAIL=[email protected]
CF_DNS_API_TOKEN=your-dns-edit-token
CF_ZONE_API_TOKEN=your-zone-read-token
CF_API_KEY=your-global-api-key
ACME_EMAIL=[email protected]
DASHBOARD_USER=admin
DASHBOARD_PASSWORD=$$2y$$...bcrypt-hash...
The dashboard password must be bcrypt-hashed. Generate one with:
echo $(htpasswd -nB admin)Then escape every $ in the hash as $$ — Docker Compose interpolates single $ as variable expansion.
Step 2 — Create the shared Docker network
Traefik discovers services by watching containers on a shared Docker network. Create it once before starting anything:
docker network create publicAll your services will join this network via their Compose files.
Step 3 — The Traefik Compose config
networks:
    public:
        name: public
        external: true

volumes:
    letsencrypt_volume:
        name: letsencrypt_volume

services:
    traefik:
        image: traefik:v3.3
        restart: unless-stopped

        volumes:
            # Read-only — Traefik only needs to watch container events, not manage them
            - /var/run/docker.sock:/var/run/docker.sock:ro
            # Persisted cert storage — don't delete between restarts
            - letsencrypt_volume:/letsencrypt

        environment:
            - CF_API_EMAIL=${CF_API_EMAIL}
            - CF_DNS_API_TOKEN=${CF_DNS_API_TOKEN}
            - CF_ZONE_API_TOKEN=${CF_ZONE_API_TOKEN}
            - CF_API_KEY=${CF_API_KEY}

        command:
            - --api=true
            - --api.dashboard=true
            - --log.level=INFO
            - --accesslog=true

            # Only route containers with traefik.enable=true
            - --providers.docker=true
            - --providers.docker.network=public
            - --providers.docker.exposedbydefault=false

            # Redirect all HTTP to HTTPS
            - --entrypoints.web.address=:80
            - --entrypoints.websecure.address=:443
            - --entrypoints.web.http.redirections.entrypoint.to=https
            - --entryPoints.web.http.redirections.entrypoint.scheme=https

            # Allows routing to backends using self-signed certs internally
            - --serverstransport.insecureskipverify=true

            # ACME via Cloudflare DNS challenge
            - --certificatesresolvers.certresolver.acme.email=${ACME_EMAIL}
            - --certificatesresolvers.certresolver.acme.storage=/letsencrypt/acme.json
            - --certificatesresolvers.certresolver.acme.dnschallenge=true
            - --certificatesresolvers.certresolver.acme.dnschallenge.provider=cloudflare

        networks:
            - public

        ports:
            - 80:80
            - 443:443

        labels:
            - traefik.enable=true

            # Dashboard — routed to its own subdomain
            - traefik.http.routers.mydashboard.rule=Host(`dashboard.yourdomain.com`) || Host(`www.dashboard.yourdomain.com`)
            - traefik.http.routers.mydashboard.service=api@internal
            - traefik.http.routers.mydashboard.entrypoints=websecure
            - traefik.http.routers.mydashboard.tls.certresolver=certresolver

            # www → apex redirect
            - traefik.http.routers.traefik.middlewares=traefik-redirect
            - traefik.http.middlewares.traefik-redirect.redirectregex.regex=^https://www.(.*)
            - traefik.http.middlewares.traefik-redirect.redirectregex.replacement=https://$${1}

            # Protect the dashboard with Basic Auth
            - traefik.http.routers.mydashboard.middlewares=traefik-dashboard-auth
            - traefik.http.middlewares.traefik-dashboard-auth.basicauth.users=${DASHBOARD_USER}:${DASHBOARD_PASSWORD}
A few things worth noting:
exposedbydefault=falsemeans containers are invisible to Traefik until you addtraefik.enable=true. Without this, every container on the network gets a route — usually not what you want.- The
letsencrypt_volumepersistsacme.jsonacross container restarts. Let’s Encrypt has strict rate limits — 5 failed validations per hour, 50 certs per domain per week. Don’t delete this volume carelessly. :roon the Docker socket is a minor security improvement — Traefik reads events but can’t control containers.
Step 4 — Expose a service
Any container on the public network gets HTTPS automatically with these labels:
networks:
    - public

labels:
    - traefik.enable=true

    # Subdomain for this service
    - traefik.http.routers.yourservice.rule=Host(`service.yourdomain.com`) || Host(`www.service.yourdomain.com`)

    # The port your container listens on internally
    - traefik.http.services.yourservice.loadbalancer.server.port=3333

    - traefik.http.routers.yourservice.entrypoints=websecure
    - traefik.http.routers.yourservice.tls.certresolver=certresolver

    # www → apex redirect
    - traefik.http.routers.yourservice.middlewares=yourservice-redirect
    - traefik.http.middlewares.yourservice-redirect.redirectregex.regex=^https://www.(.*)
    - traefik.http.middlewares.yourservice-redirect.redirectregex.replacement=https://$${1}
yourservice is just a unique identifier — it needs to be consistent across all label keys for that container, and
unique across all containers on the network. 3333 is whatever port your app binds to inside Docker; Traefik handles
the external 443 → internal port translation.
Gotchas
The first certificate takes several minutes. DNS propagation plus Let’s Encrypt’s polling window both take time.
Your browser will show a TLS warning until the cert is issued. Watch Traefik’s logs with docker logs traefik -f —
you’ll see the challenge being created, verified, and the cert being stored.
Use the staging endpoint during testing. Add this command to Traefik while you’re iterating:
--certificatesresolvers.certresolver.acme.caserver=https://acme-staging-v02.api.letsencrypt.org/directoryStaging certs aren’t browser-trusted but they bypass the production rate limits entirely. Switch to the production endpoint (by removing that line) only when you’ve confirmed the flow works end-to-end.
Every router name must be unique. traefik.http.routers.<name> shares a namespace across all containers on the
network. If two containers use the same name, Traefik picks one arbitrarily and silently drops the other. Use your
service name as the prefix — traefik.http.routers.api, traefik.http.routers.frontend, etc.
Cloudflare proxy and real client IPs. When Cloudflare proxies your traffic, Traefik’s access logs will show
Cloudflare’s IP ranges, not real visitor IPs. Configure Traefik to trust Cloudflare’s IP ranges and read the CF-Connecting-IP header if you need accurate client IPs for logging or rate limiting.
That’s the complete setup. Add a DNS record for any new subdomain in Cloudflare, drop the four labels on the container, and Traefik picks it up within seconds — cert included.